How to Paint Your Kitchen Cabinets
I know this post has been a long time coming. The blog has taken a back burner since being pregnant. Thank you all for being patient with me with this post. I know a lot of you have asked multiple times about it and I am so glad to finally have it for you. I hope this tutorial will help guide you through the process of painting your own cabinets. As always if you have any questions about the process or need more clarification please feel free to leave a comment or send me an email.
Unfortunately, I don’t have many photos from the process – I some how deleted them from my phone. But I hope my steps are clear enough so you can do this on your own!
For my kitchen, I decided to paint the inside of the cabinets as well. This was mainly because the insides of my cabinets were stained very dark and it wouldn’t have looked right if I kept them that way. We also have a few glass cabinets so the insides needed to be painted anyways. If you do not need to paint the insides of the cabinets I would recommend painting the cabinets with a high end paint brush instead of using a paint sprayer.
Supplies:
- Paint Sprayer – We have this paint sprayer that we found on craigslist but there are more affordable options like this one here or here.
- Krud Kutter
- Bondo Wood Filler
- Zinsser Bin Primer
- Kilz Adhesion Primer
- Benjamin Moore Advance Paint in Semi- Gloss : When choosing the perfect color I went with Simply White which is one of the few whites with hardly and undertones.
- Painters Tape
- Paint Brush
- Painters Plastic
- Electric Mouse Sander
Steps:
Preparation:
- Remove all cabinet hardware
- Remove the cabinet fronts and drawers : We set up a “shop” in our garage and painted all the cabinet drawers and fronts in the garage to keep the mess some what contained. To protect the garage we hung painters plastic around the walls and on the floor.
- If you have knotty alder wood or have any spots that you want to fill (replacing hardware and need different holes) use the bondo wood filler. The wood filler is by far superior to any basic wood filler. It sands super smooth and I can not see any of the knots that used to be in my cabinets.
- Clean all cabinets with the Krud Kutter. This is an important step to get all the grease off the cabinets or else the paint won’t stick over time.
- Sand the cabinets with the electric mouse sander with 220 grit. The purpose of this step is to roughen the surface just enough so the primer has something to adhere to.
- Wipe down the cabinets with a damp cloth to remove any sandy residue.
- Tape off the countertops and the backsplash with painters plastic – or anything you don’t want covered in paint. If you are using a paint brush and not a paint sprayer this step isn’t as important but you still want to make sure you have everything covered properly. If you are spraying, make sure you get every inch of the kitchen that you don’t want painted. The paint will linger and travel in the air and go everywhere! We also draped painters plastic along the ceilings, the floor and taped off the the kitchen from the rest of the house. This was the step that literally took longer then painting it. Prepping was time consuming but vital. As long as you are fully prepped the paint spraying is super easy and quick! This is also why if you aren’t painting the insides of your cabinets I would just recommend using a paint brush and roller. The preparation for the paint sprayer took about an entire day!
Paint:
- Paint 1 coat using the Kilz Adhesion primer – let dry over night.
- Paint 2 coats of the Bin Primer, let dry 24 hours in between coats. If you have cherry or knotty cabinets it is vital to use this primer. This primer is a stain blocker and if you have knots or cherry wood they will bleed through over time if not primed correctly.
- Paint 2-3 coats of the Benjamin Moore Advance Paint. I did SO MUCH research on what type of paint to use. I am in love with the Benjamin Moore Advance Paint. It dries with a hard surface and does not need to be protected with a polyurethane. The paint is also self leveling so you do not see any brush strokes. We did 2 coats and then realized some spots needed another coat. In between coats, sand with a 600 grit sand paper. Make sure you wipe the cabinets clean with a damp cloth to remove any sand residue. With the paint sprayer, we also noticed some drips and had to sand down the drip marks in between paint coats.
Reassemble:
- Put back on the cabinet fronts and drawers
- Put back on the cabinet hardware
- Touch up any areas with paint as needed
In all, painting our entire kitchen took about 1 week. But, we only worked after my husband came home from work, so only a few hours a night. The most time consuming step was the prep work to protect the rest of the kitchen from the paint sprayer. If you have never used a paint sprayer before, make sure you test it out on a spare piece of wood to get the hang of it before you begin.
Other Important Notes to Remember
- Make sure you have proper ventilation – wear a mask!
- I can’t say this enough, take your time prepping and the spraying will be super easy!
- When you tape off your kitchen from the rest of the house, make sure there is enough air circulating for the paint to dry. We used a kids tunnel to bring air from the kitchen through a side window.
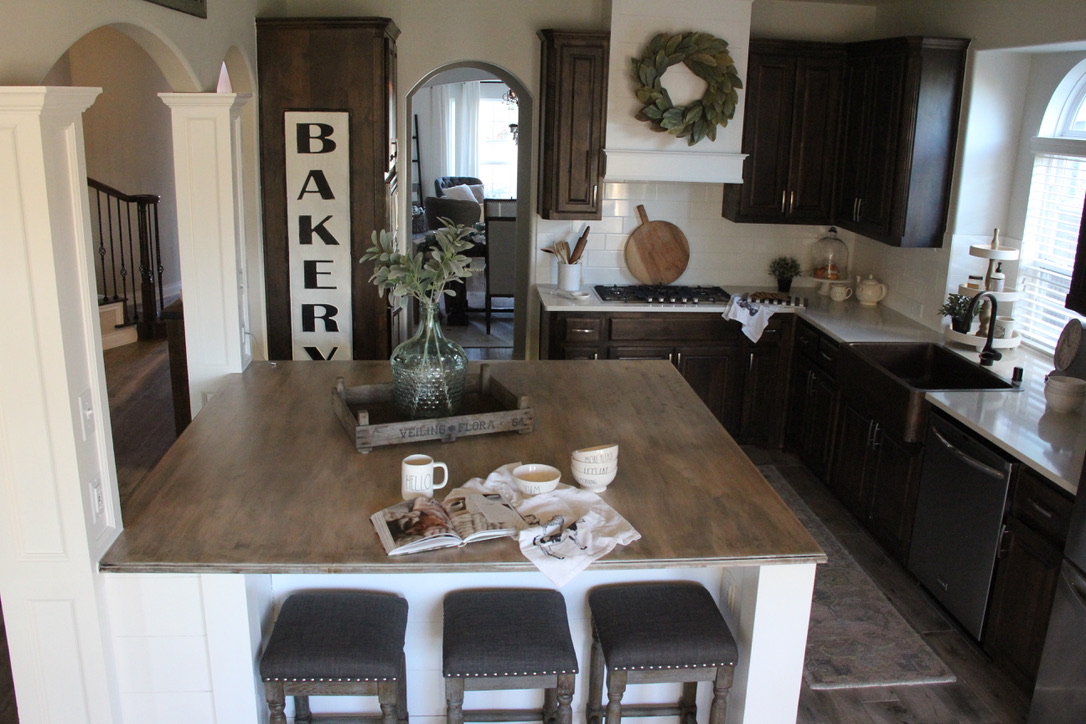
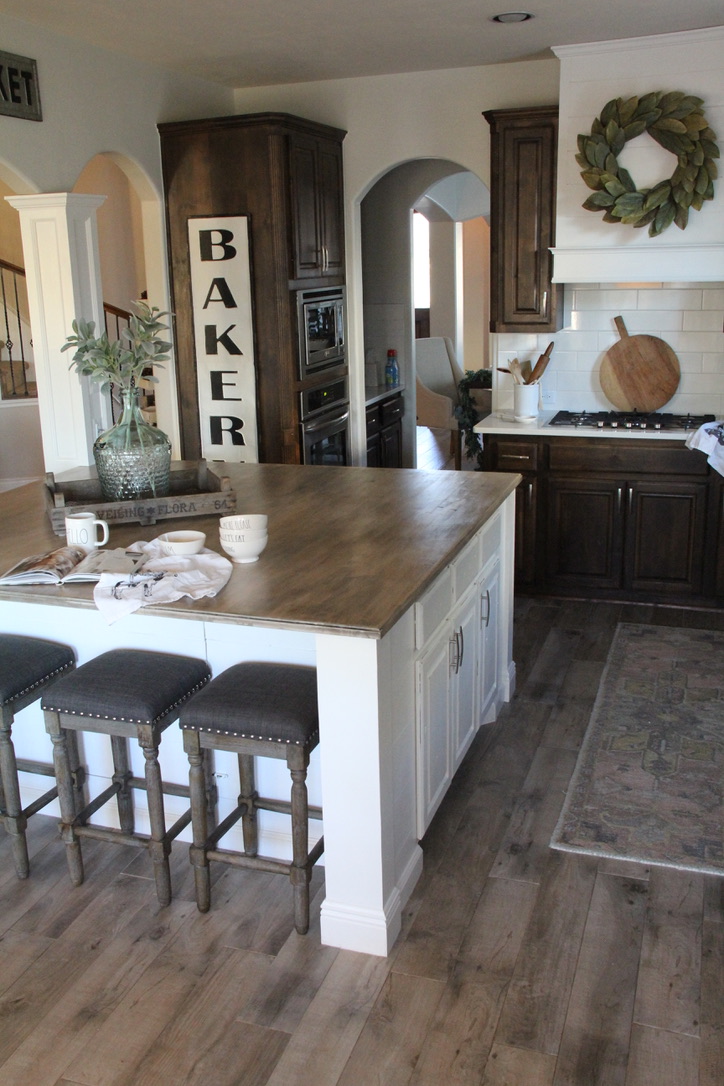
Before
After
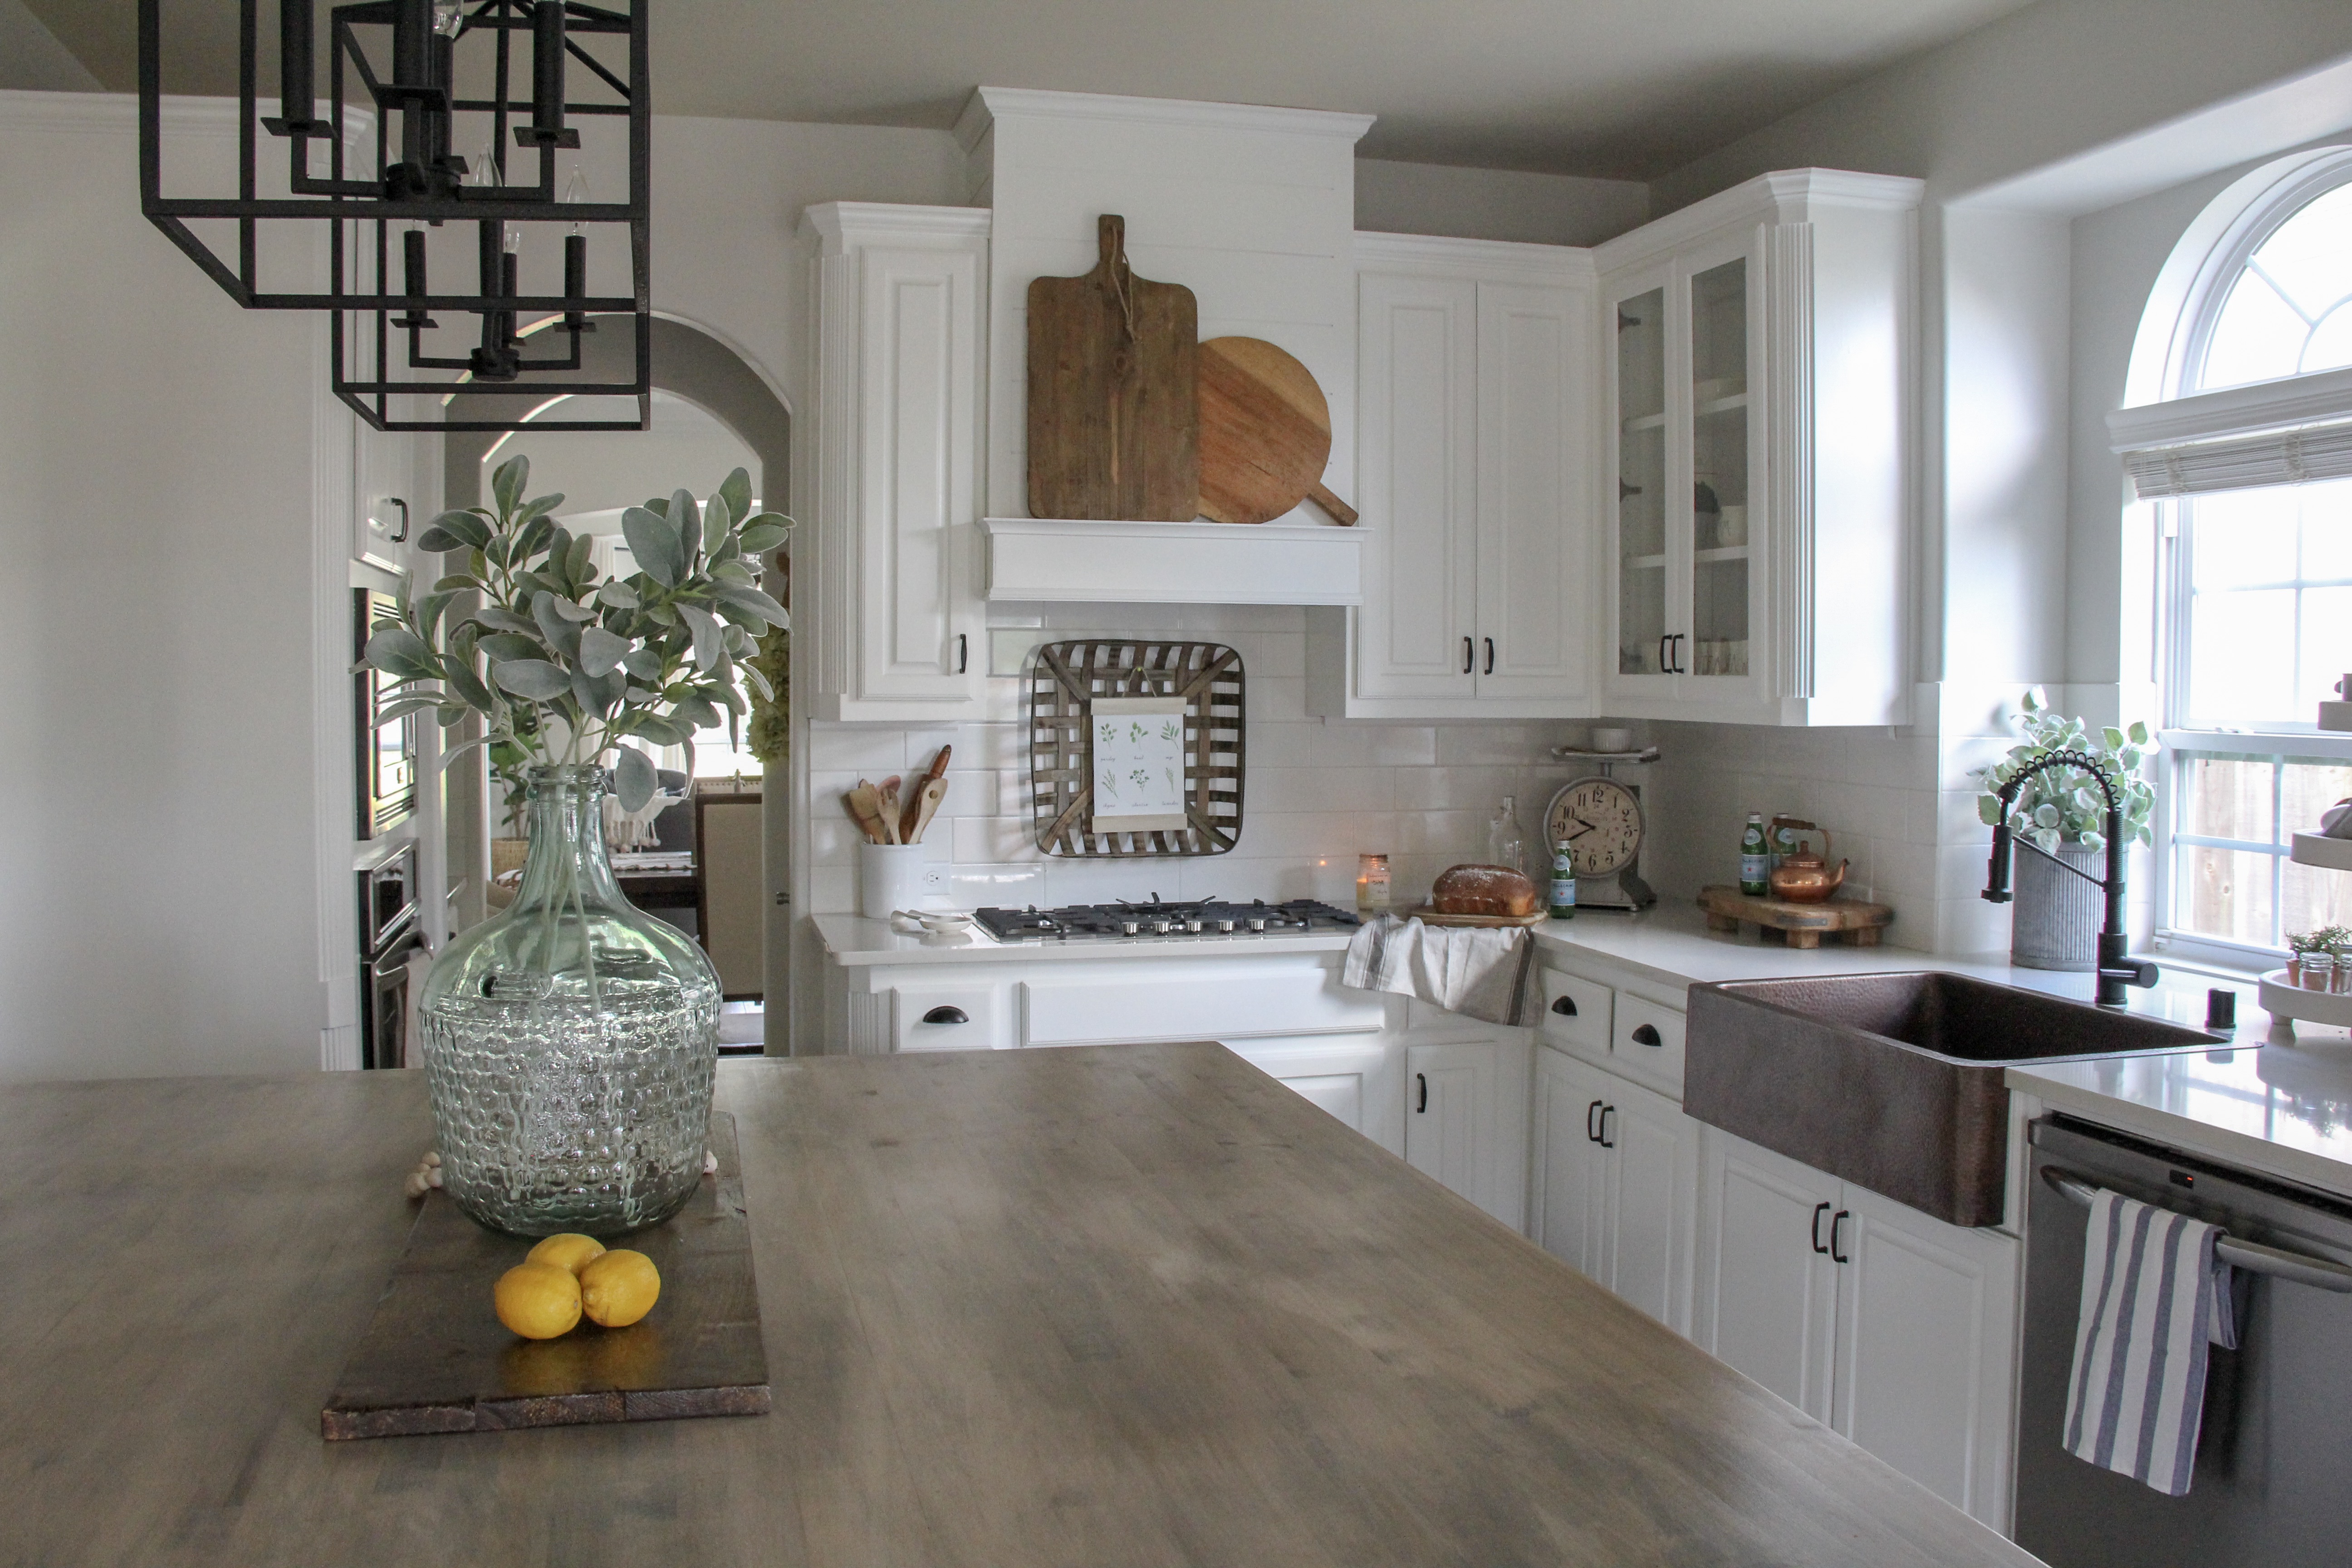
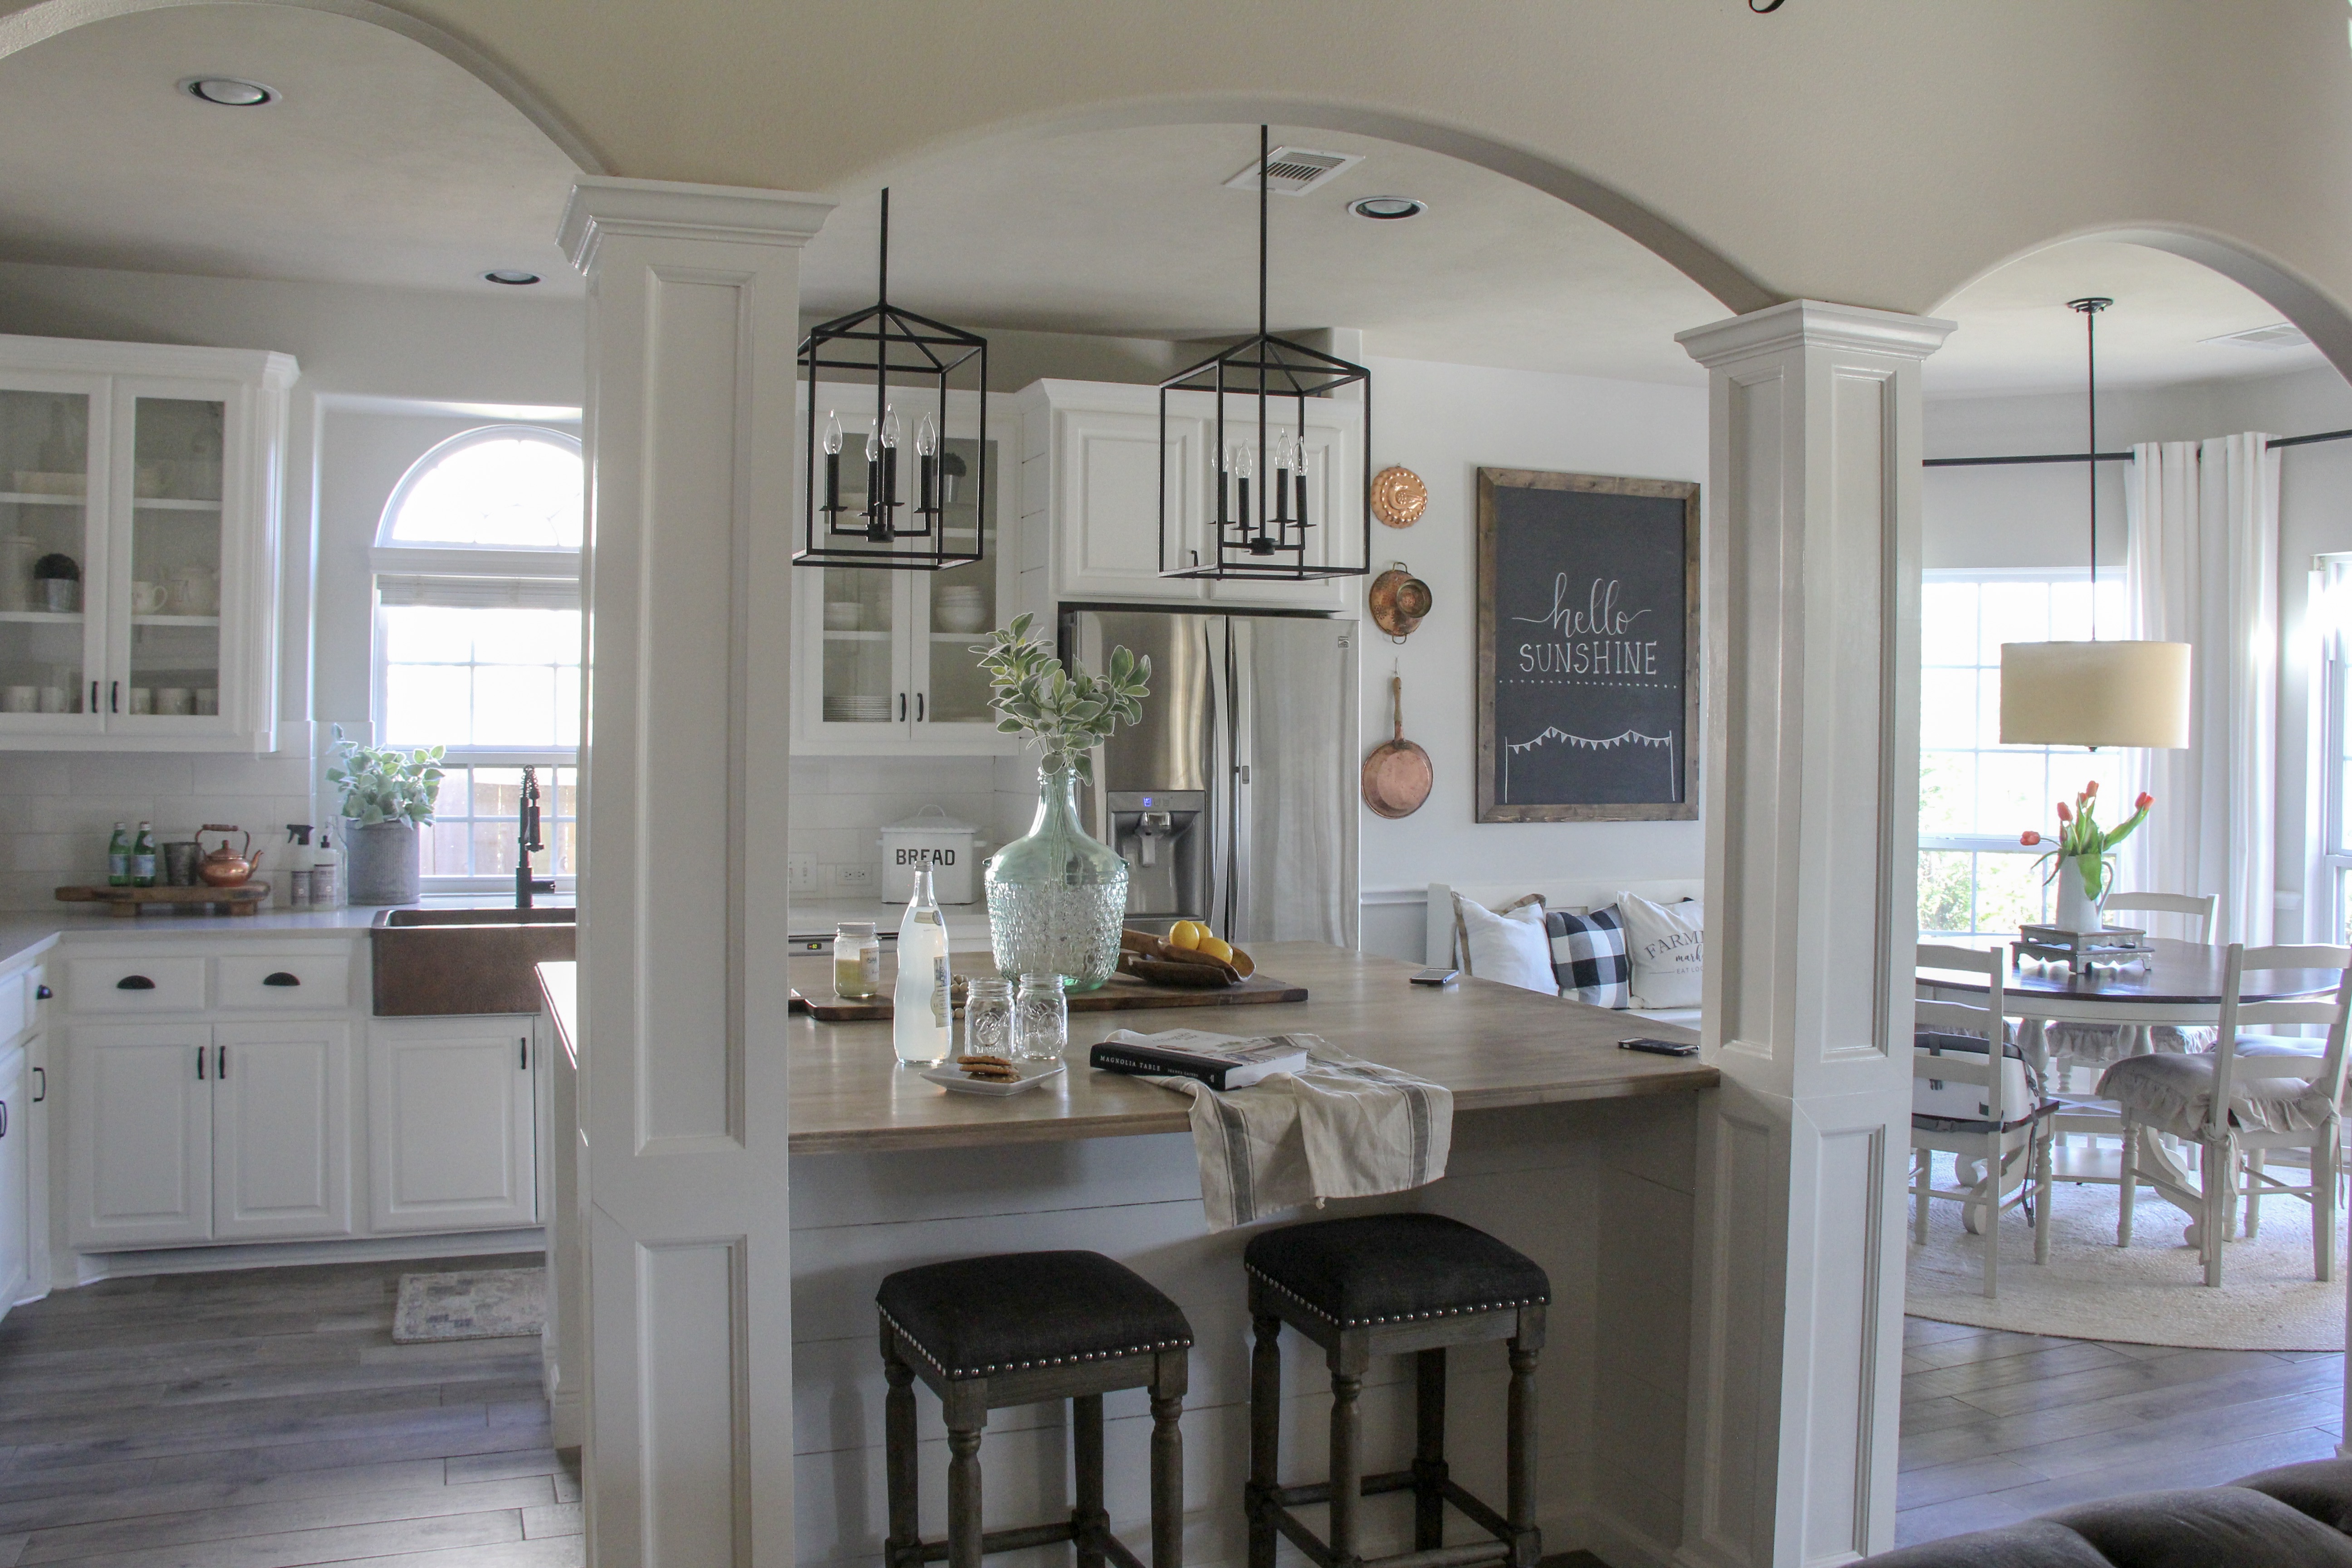
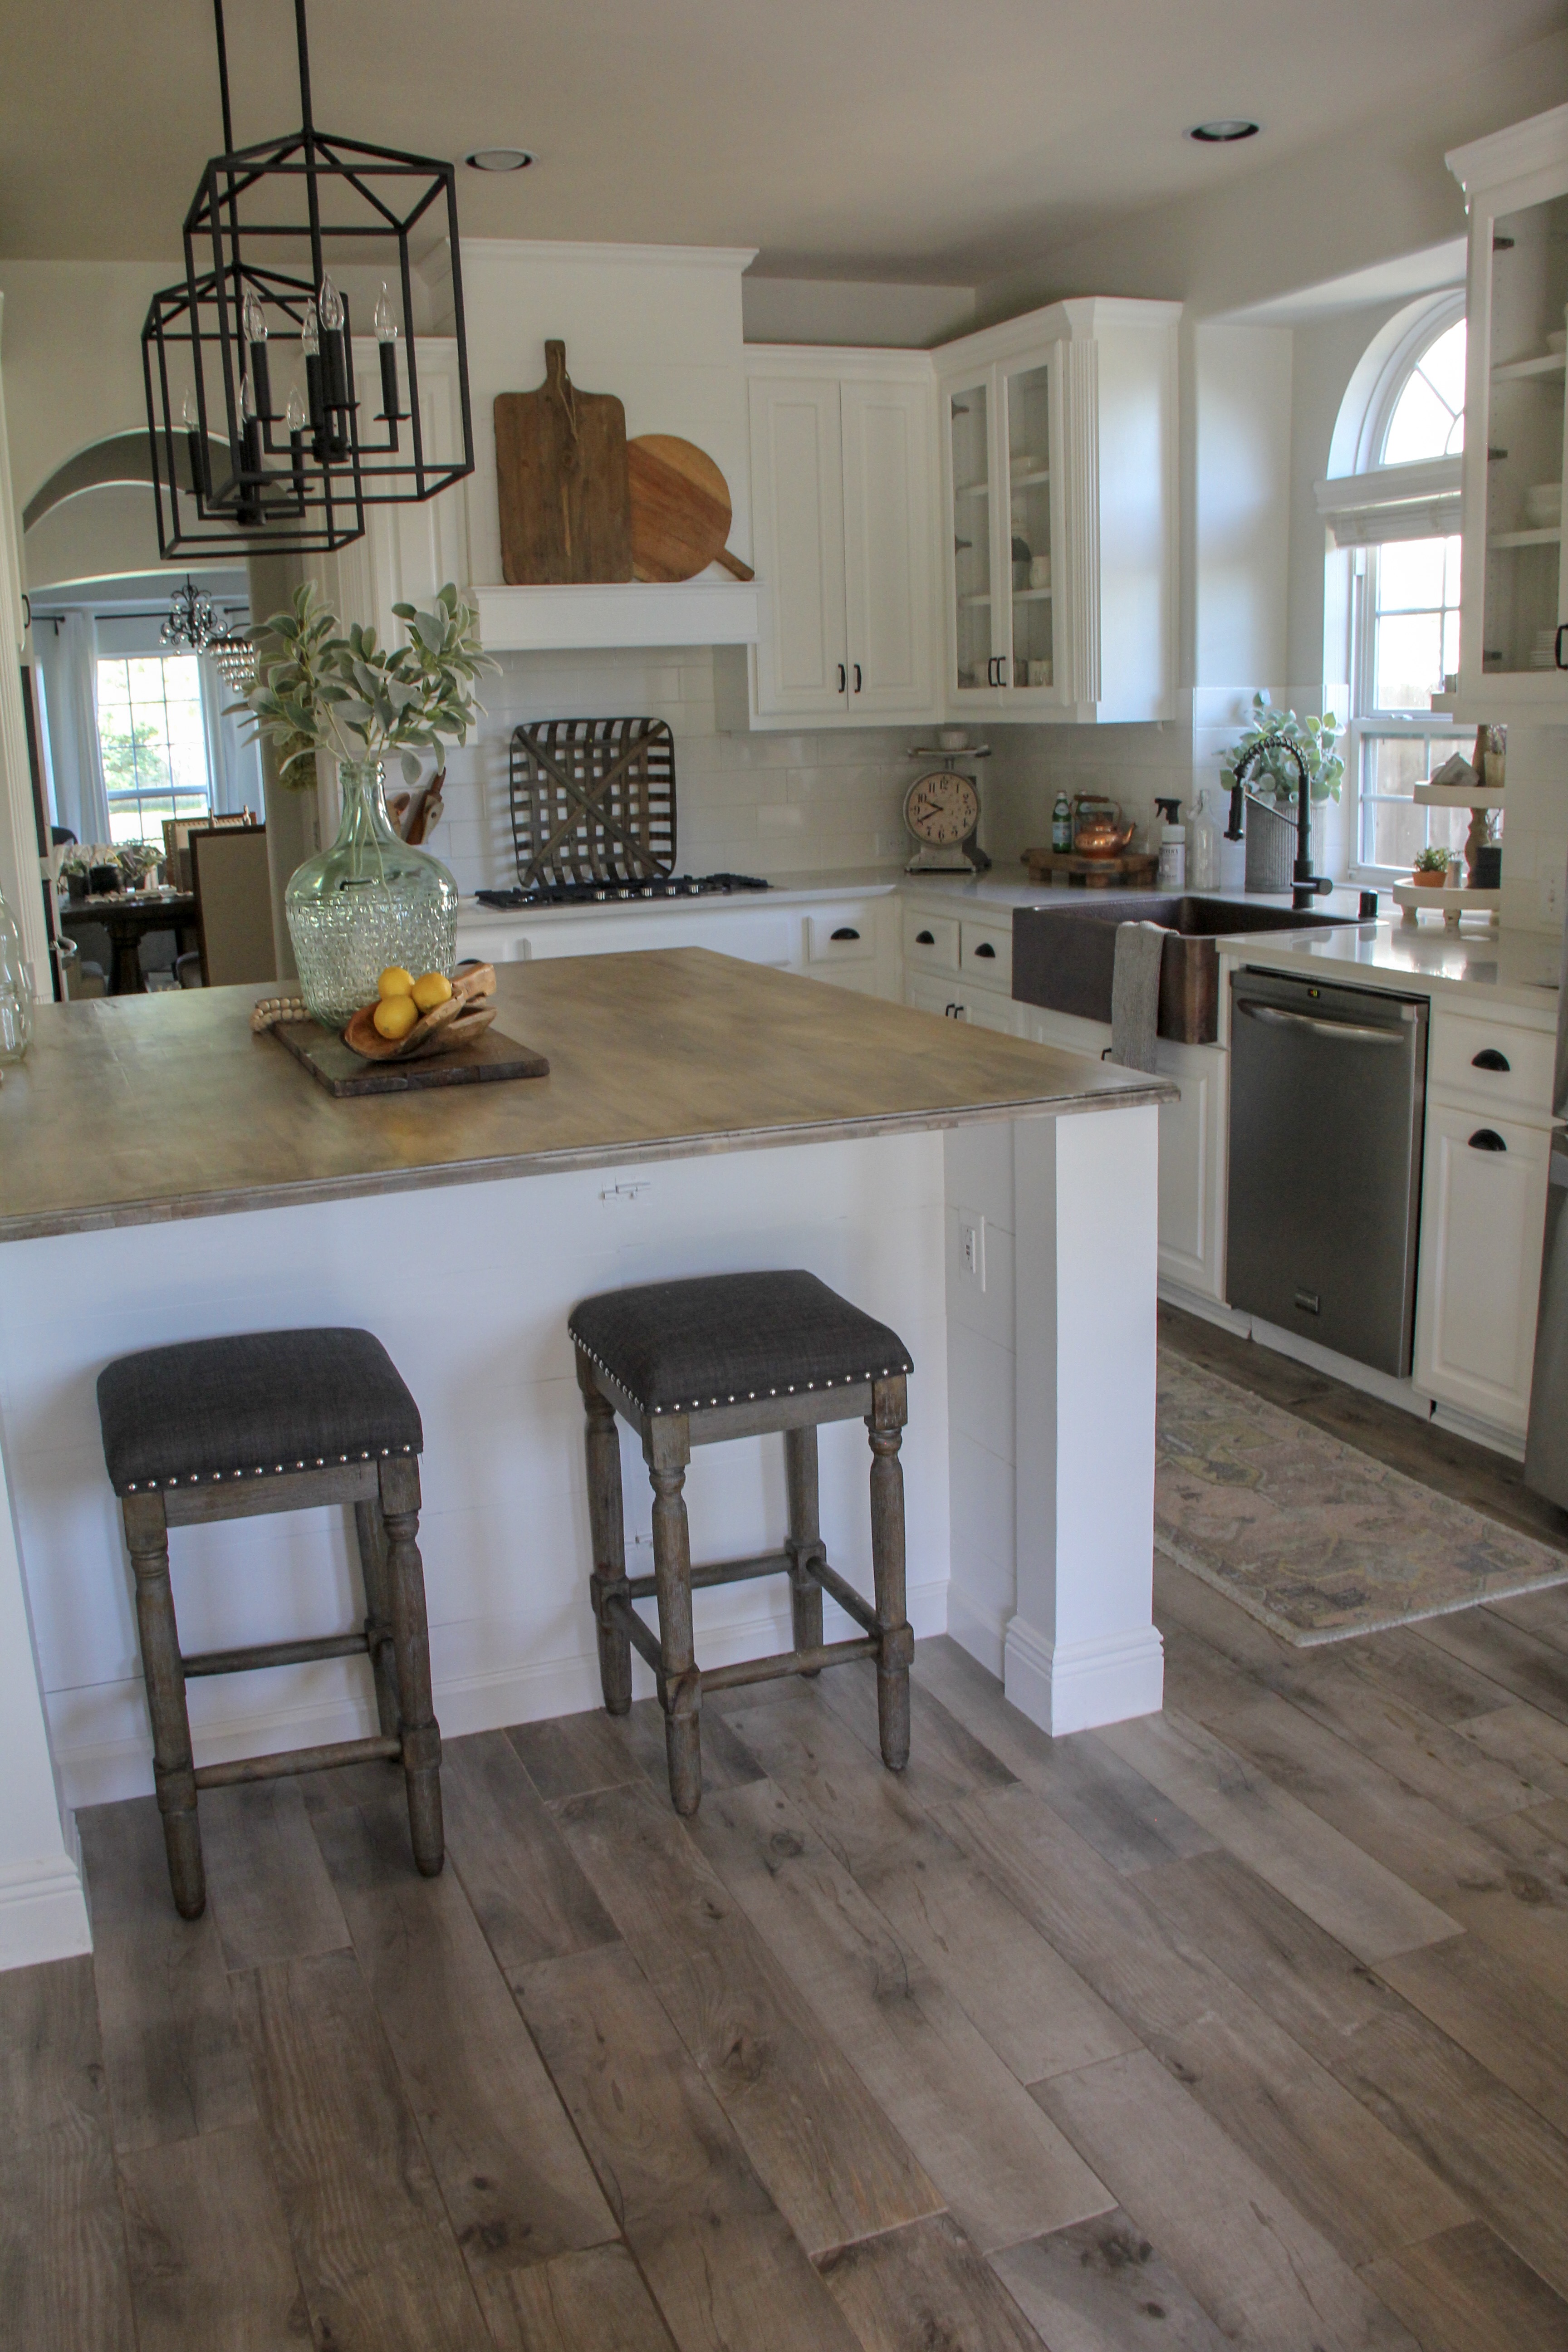
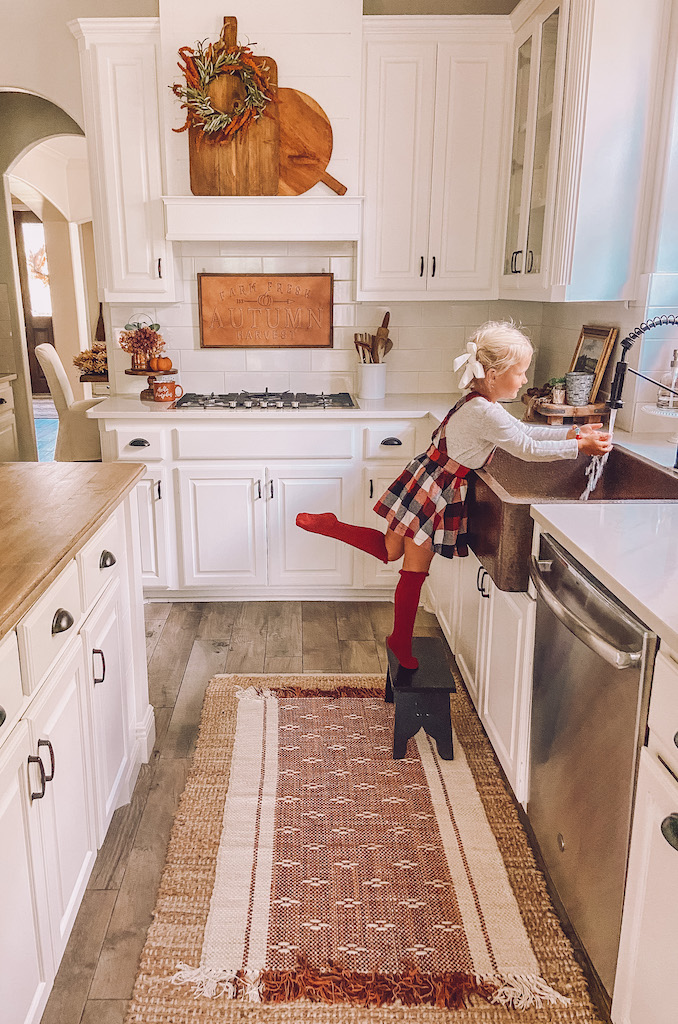
It is crazy how much the white brightens up this space. I love how it turned out and just wish I had tackled it sooner!
xoxo,
Leanna


First of all I love the way your kitchen looks! We are wanting to paint our kitchen cabinets too. The problem is we have Decorators White on all of our trim and from what I read this white does not play nice with other whites. We are planning on painting our walls Pale Oak. Any recommendations on what white to go with for the cabinets? Did you paint your trim in your house to match all the other whites? Deciding whether or not I need to change the color of the trim. Regards!
We bought a old farmhouse and the cabinets are painted white would it be better to strip cabinets first ?
I am new to your blog and loving it so far! I was curious, now that some time has passed have you noticed if any of your cabinets are chipping? I was all ready to paint our kitchen and then I heard from several people how they were a pain to maintain because of the chipping. What do you think?
the only one that has chipped is the one that has a pull out for the garbage. but I think if it was wood it would also need to be refinished more often since it used all the time! I just have extra paint that I apply when I notice its chipping. But overall we have not had any issues!