DIY Resin Phone Case
These DIY resin phone cases are the ultimate trendy girls craft night activity for tweens, teens, birthdays, sleepovers, or girls nights at home. Using UV resin, clear phone cases, and fun embellishments like pearls, rhinestones, flowers, glitter, and seashells, everyone can create a completely customized phone case that looks boutique-inspired and high-end. This easy craft idea doubles as both an activity and a personalized party favor guests can take home.
Servings 2
Ingredients
- Clear hard-shell phone cases
- UV resin kit with UV curing light
- flowers
- Pearls
- Rhinestones
- Letter charms
- Mini seashells
- Glitter
- Gold flakes
- Decorative resin decals
- Tweezers
- Silicone applicator or small craft brush
- Toothpicks
- Disposable gloves
- Disposable table covering or parchment paper
Instructions
- Start by setting up your crafting station with all of the resin supplies, embellishments, and phone cases organized into bowls or trays. Cover the table with parchment paper or a disposable tablecloth to protect the surface from resin drips and glitter.
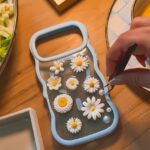
- Lay the clear phone case flat on the table and begin selecting your embellishments. Arrange the dried flowers, rhinestones, pearls, glitter, seashells, and charms directly onto the phone case to create a mockup of your design before using any resin.
- Once you are happy with the layout, carefully remove all of the embellishments and keep them nearby in the same arrangement so they are easy to place back down later.
- Apply a thin even layer of UV resin directly onto the phone case using a silicone applicator or small craft brush. Be careful not to apply the resin too thick or it may overflow the edges during curing.
- Before placing the embellishments back onto the case, closely inspect the resin for air bubbles. Use a toothpick or small tool to gently pop or remove any bubbles so the final finish looks smooth and glossy.
- Carefully place all of the embellishments back into the resin according to your original mockup design. Tweezers work especially well for placing smaller pearls, rhinestones, flowers, and glitter pieces more precisely.
- Once the design is complete, place the phone case under the UV curing light included in the resin kit. Cure according to the package instructions until the resin fully hardens and sets.
- For an extra glossy and durable finish, apply an additional thin top coat of resin over the entire design and cure again under the UV light.
- Allow the phone case to fully cool and harden before handling or packaging.
Video
Notes
- Less resin is better than too much resin. Thin even layers cure more smoothly and help prevent bubbling.
- Use tweezers for detailed placement of pearls, rhinestones, and tiny embellishments.
- Keep baby wipes and paper towels nearby for easy cleanup during the craft night.
- UV resin cures quickly which makes this craft perfect for parties and girls nights.
- Clear hard-shell phone cases work best for resin projects because the embellishments fully show through.
- Adult supervision is recommended for younger children while working with resin and UV lights.