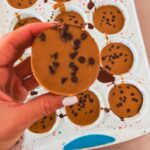
No-Bake Peanut Butter Oat Cups
These quick and easy No-Bake Peanut Butter Oat Cups are made with just 6 ingredients and loaded with sweet, chocolatey peanut butter layers for the perfect treat to share with friends and family.
Servings 12 cups
Ingredients
Oat Layer
- 2 cups quick-cooking oats
- ½ cup honey
- ⅓ cup all-natural creamy peanut butter
- Optional: 1–2 teaspoons water only if mixture feels too dry
Chocolate Layer
- 6 ounces dark chocolate chopped
- 2 teaspoons coconut oil
Peanut Butter Layer
- ½ cup all-natural creamy peanut butter
- 1 teaspoon coconut oil
- ¼ cup mini chocolate chips
Instructions
Make The Oat Base:
- Start by adding the quick-cooking oats, honey, and creamy peanut butter to a medium mixing bowl. Stir everything together until the oats are evenly coated and the mixture becomes thick and sticky. If it feels a little dry or crumbly, add 1 to 2 teaspoons of water and mix again until the mixture easily presses together. You’re looking for a texture that holds its shape when pressed.
Prep The Muffin Tin
- Line a standard muffin tin with paper liners or use a silicone muffin tin for easy removal. Silicone works especially well for no-bake recipes and makes popping the cups out effortless once they’re set.
Press In The Oat Layer:
- Divide the oat mixture evenly between the muffin cups. Using the back of a spoon or your fingers, press the mixture firmly into the bottom of each cup. Taking the extra time to compact the oats helps the cups hold together and creates a sturdy base for the layers on top.
Make The Chocolate Layer:
- Add the chopped dark chocolate and coconut oil to a microwave-safe bowl. Microwave in short 20–30 second intervals, stirring between each one, until the chocolate is completely melted and smooth.
Add The Chocolate Layer:
- Spoon the melted chocolate evenly over the pressed oat base in each muffin cup, spreading it gently to the edges. Place the muffin tin in the refrigerator for about 10–15 minutes, just until the chocolate layer firms up slightly. This step helps keep the layers clean and prevents the peanut butter from mixing into the chocolate.
Prepare The Peanut Butter Topping:
- In a small bowl, gently warm the peanut butter with the coconut oil until smooth and pourable. Stir well to combine. This makes it much easier to spread over the chocolate layer without disturbing it.
Finish The Cups:
- Spoon the peanut butter mixture over the chocolate layer and gently smooth it out. Sprinkle mini chocolate chips evenly over the top of each cup, lightly pressing them in so they stick.
Chill Until Set:
- Return the muffin tin to the refrigerator and chill for 30–45 minutes, or until all layers are fully set and firm. Once set, remove the cups from the tin and enjoy right away, or transfer them to an airtight container for storage.
Video
Notes
Storage:
- Store leftover cups in an airtight container in between layers of parchment or wax paper (to prevent sticking) in the fridge for up to 7 days.
- Store extra cups in a freezer-safe container for up to 2 months. Let them thaw in the refrigerator or at room temperature for a few minutes before serving again.
- These no-bake oat cups are great for meal prep and to have for a grab-and-go snack. Make them up to 3 days in advance and store in the fridge or freezer until ready to serve.
- A silicone muffin tin works well for this recipe and makes removing the cups effortless.
- Chilling the chocolate layer briefly before adding the peanut butter helps keep the layers clean and defined.
- If your peanut butter is thick, warming it slightly makes spreading much easier.
- These cups taste best chilled but can sit at room temperature for a few minutes before serving.
- Press the oat layer firmly to prevent crumbling. Use quick-cooking oats for the best texture—old-fashioned oats will be too chewy here.
- For a bakery-style finish, lightly press the mini chocolate chips into the top layer before chilling.