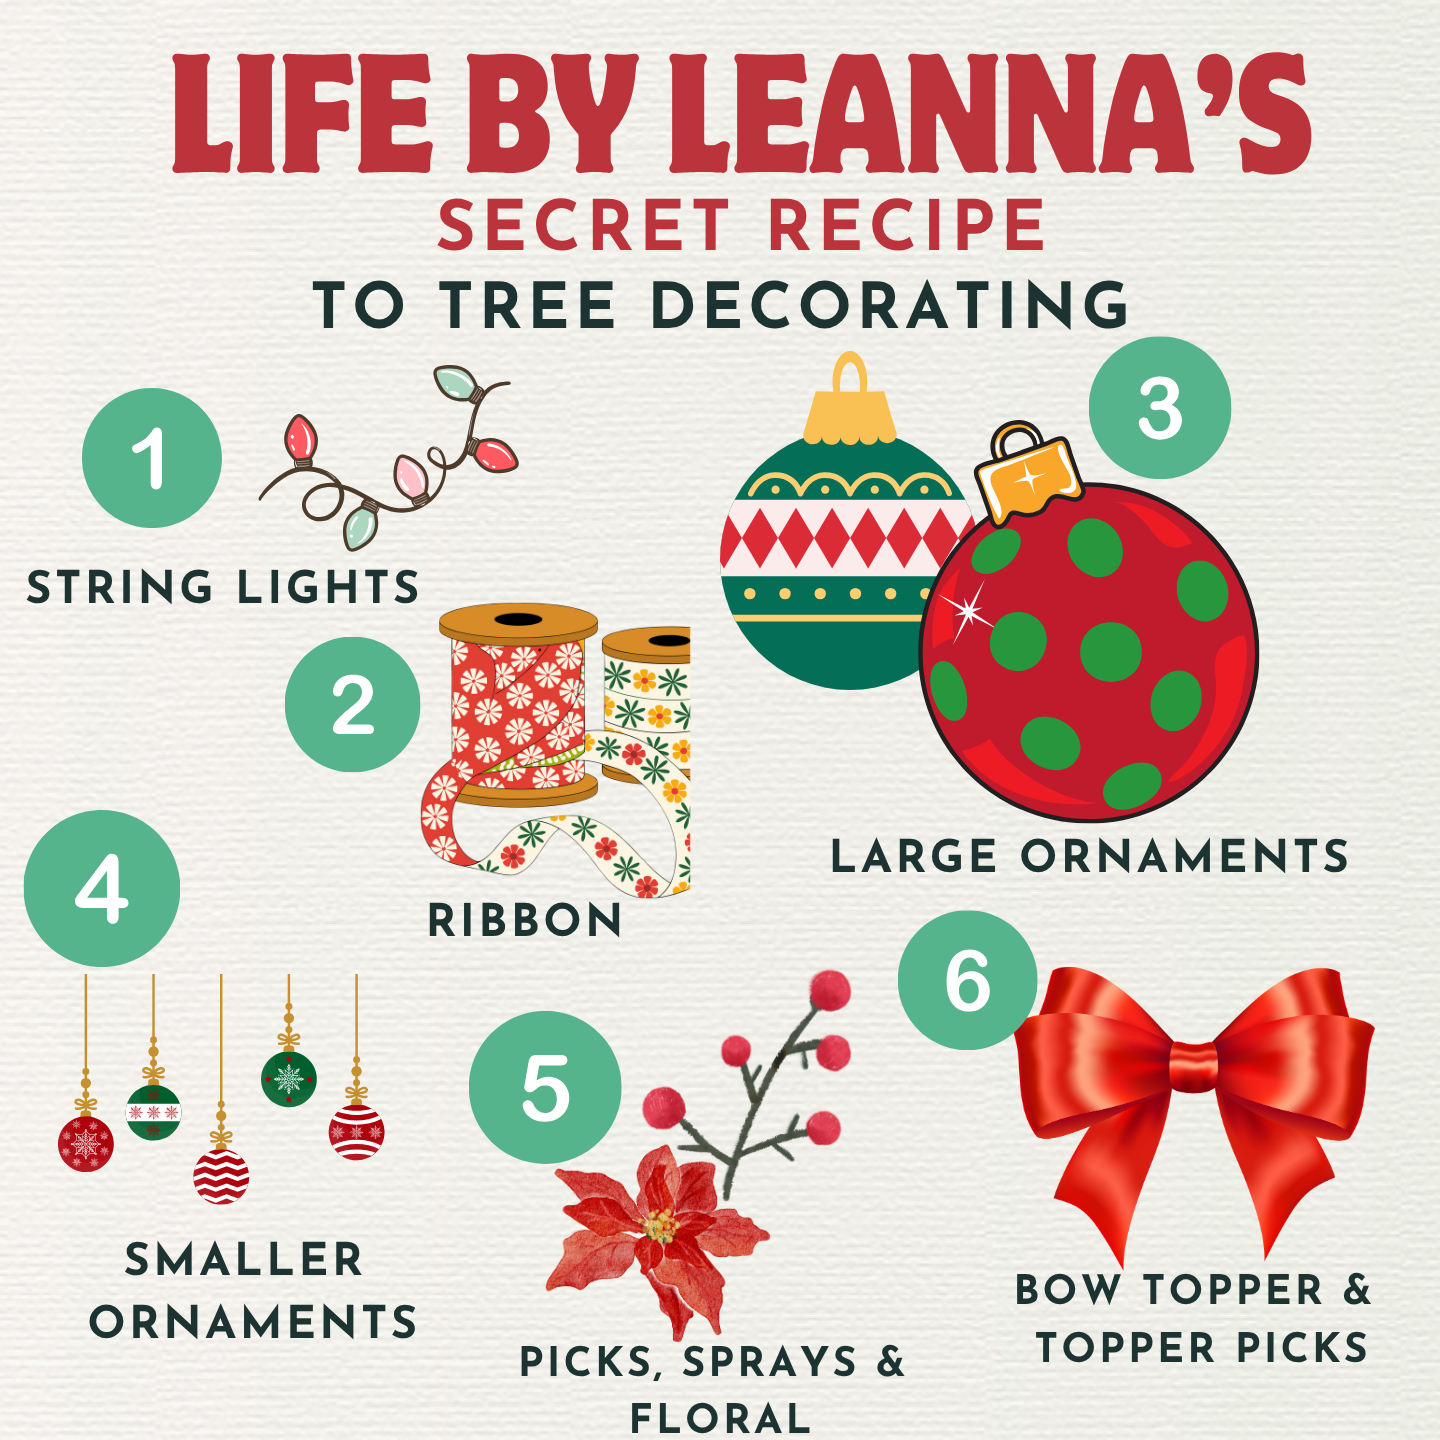
How to Decorate a Christmas Tree
Christmas decorating is my absolute favorite way to bring magic into our home. Every year, I turn on the holiday music, light a candle, and pull out the bins of ornaments . I love creating a space that feels warm, cozy, and joyful — a little bit of sparkle that makes my kids’ eyes light up when they walk down the stairs.
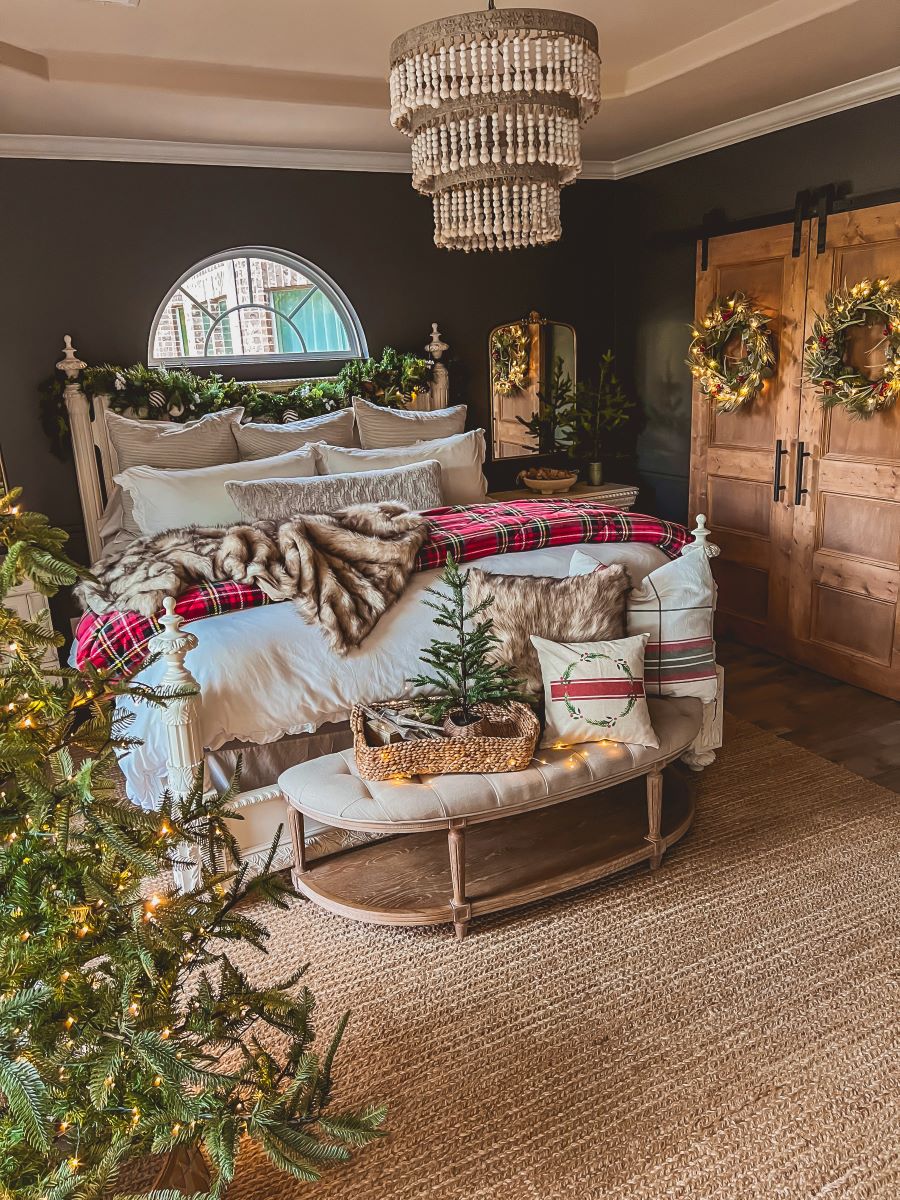
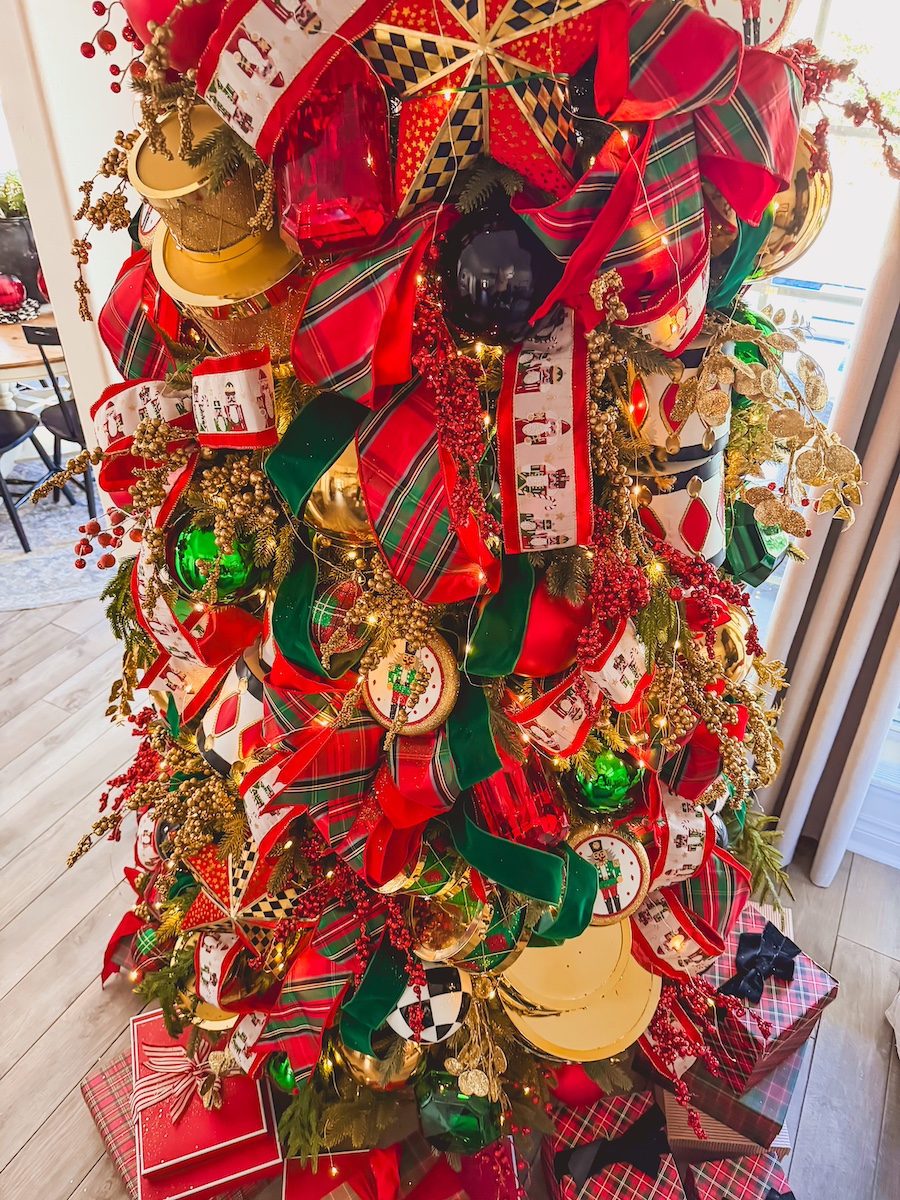
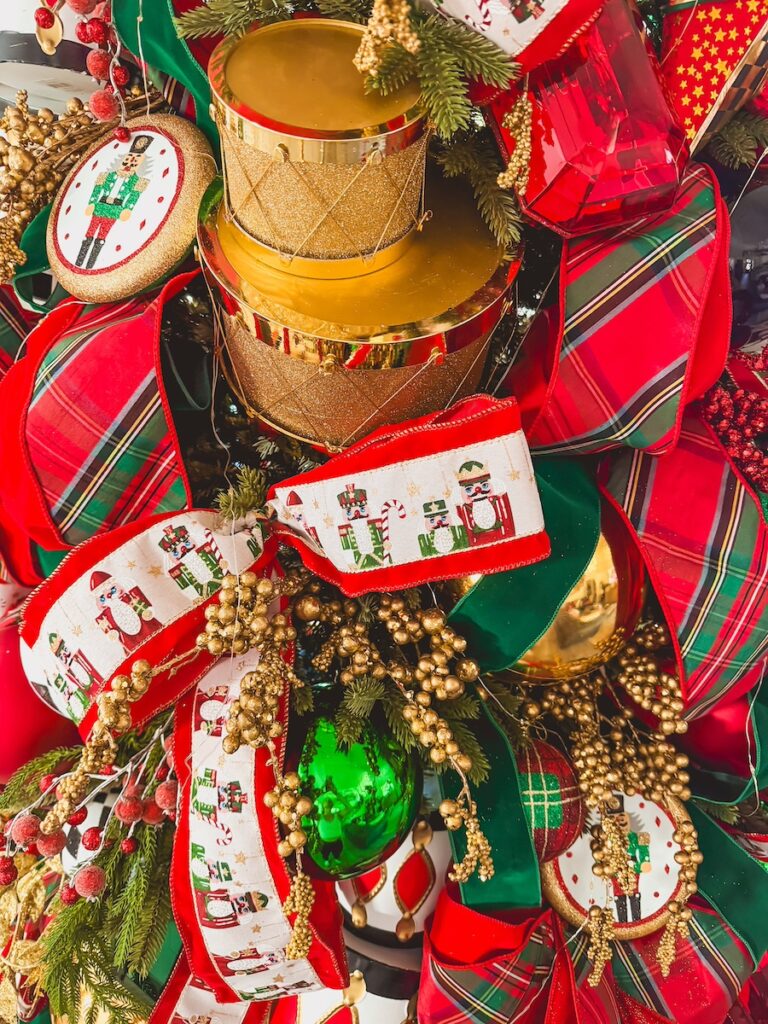
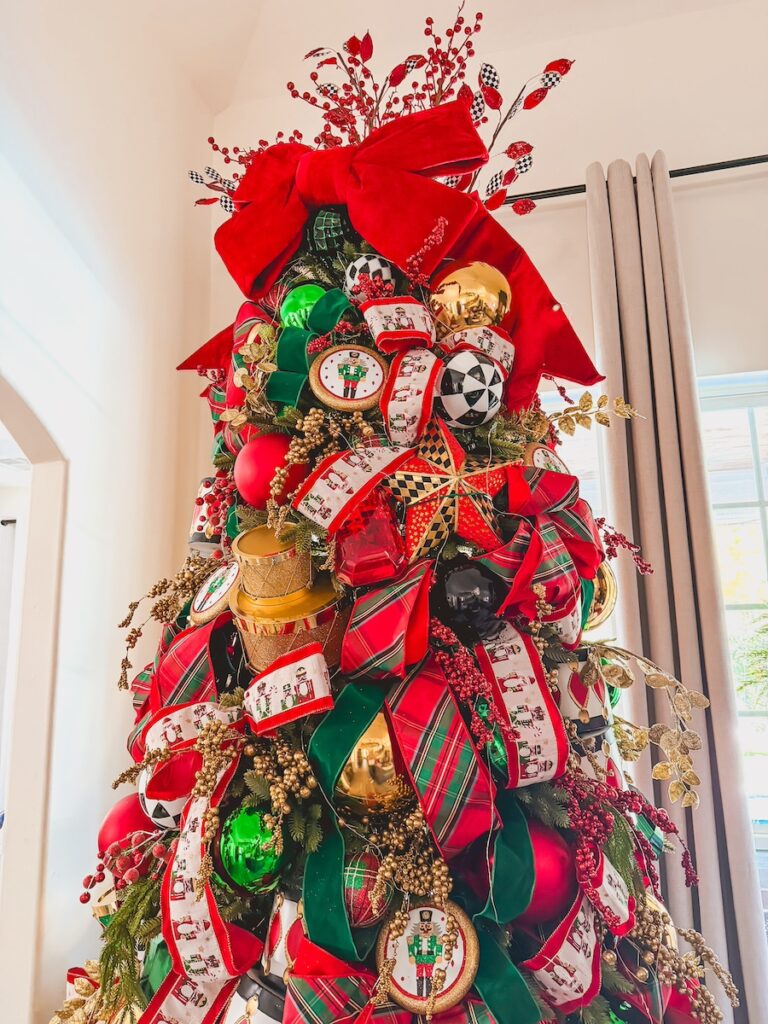
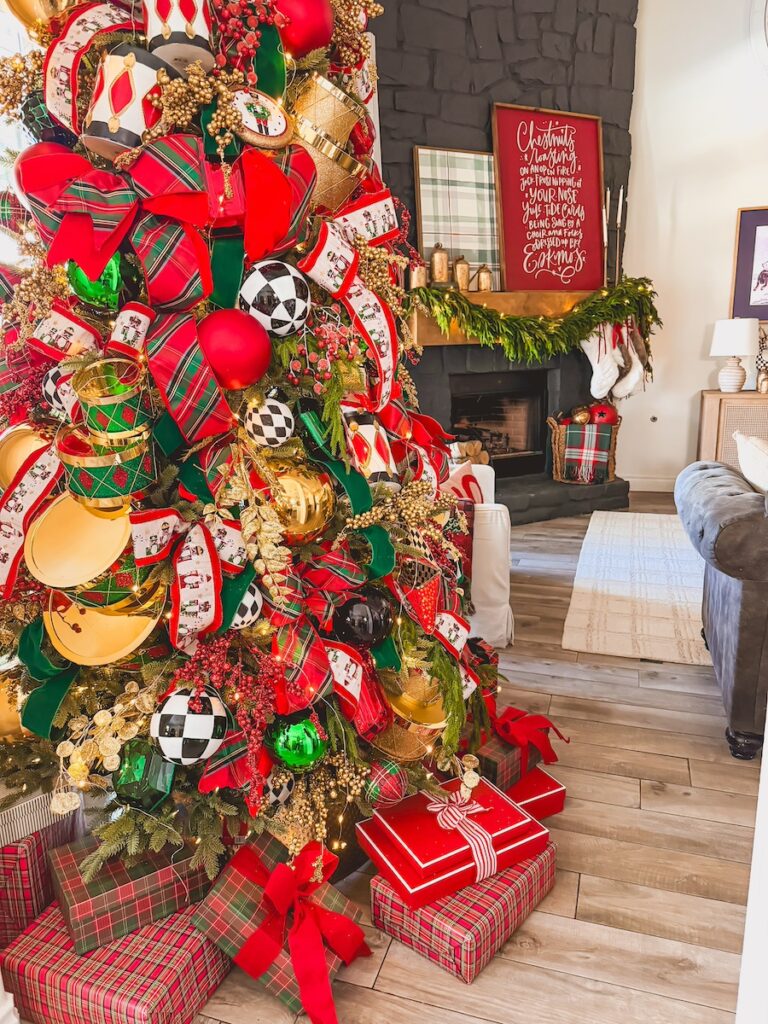
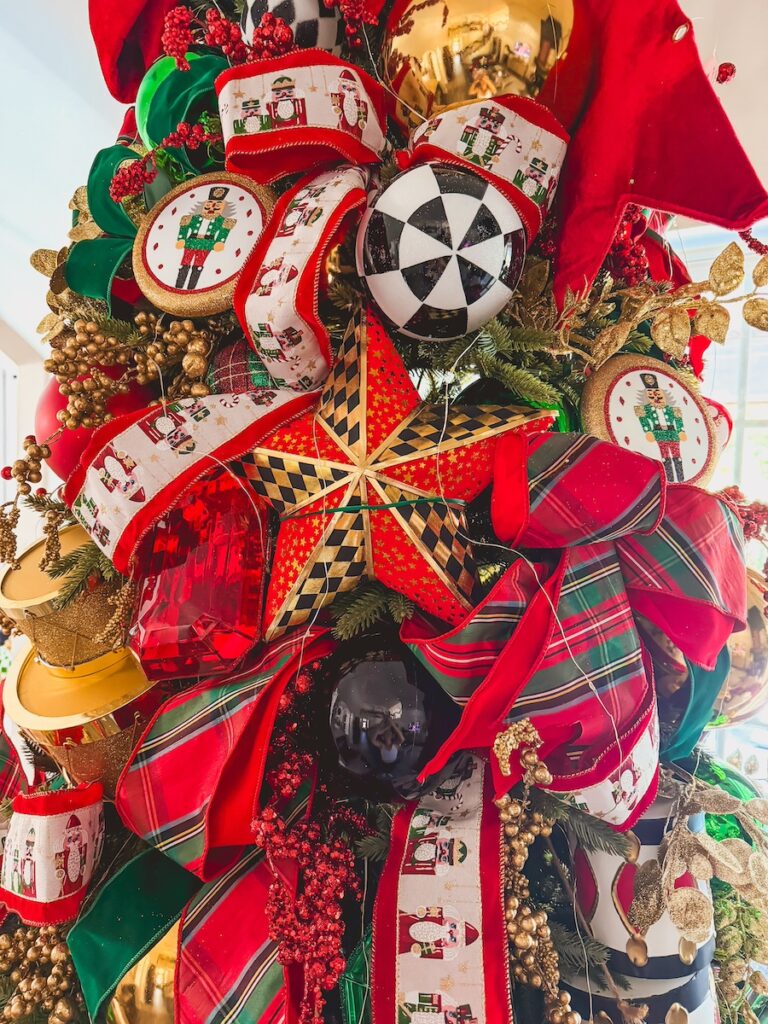
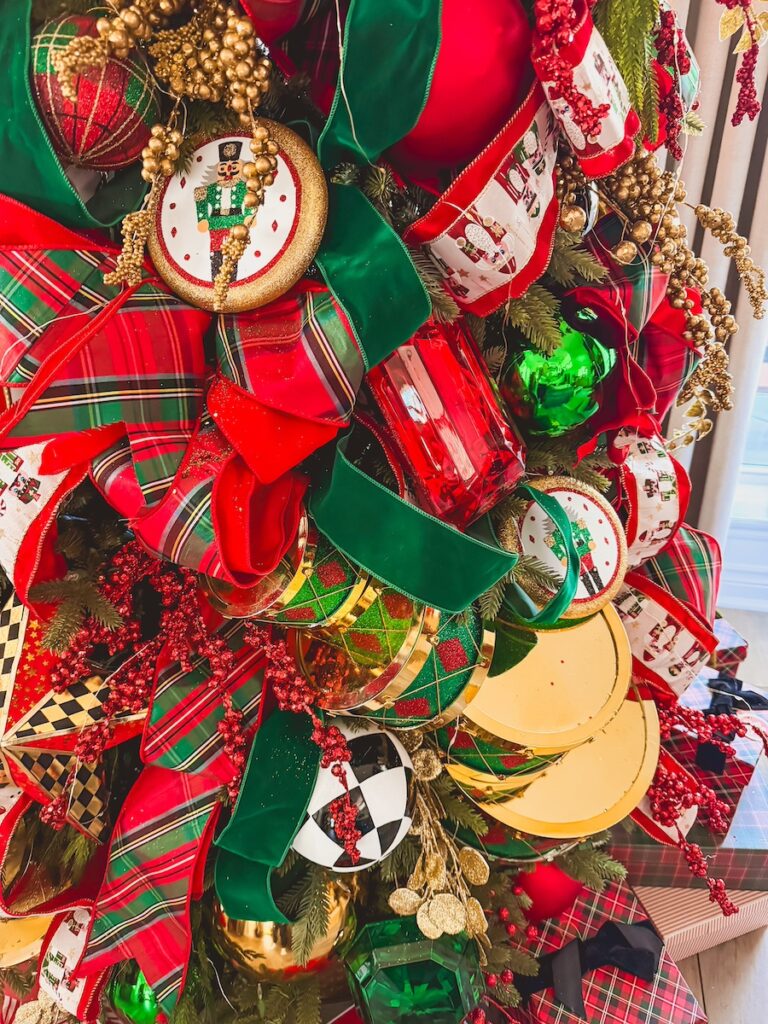
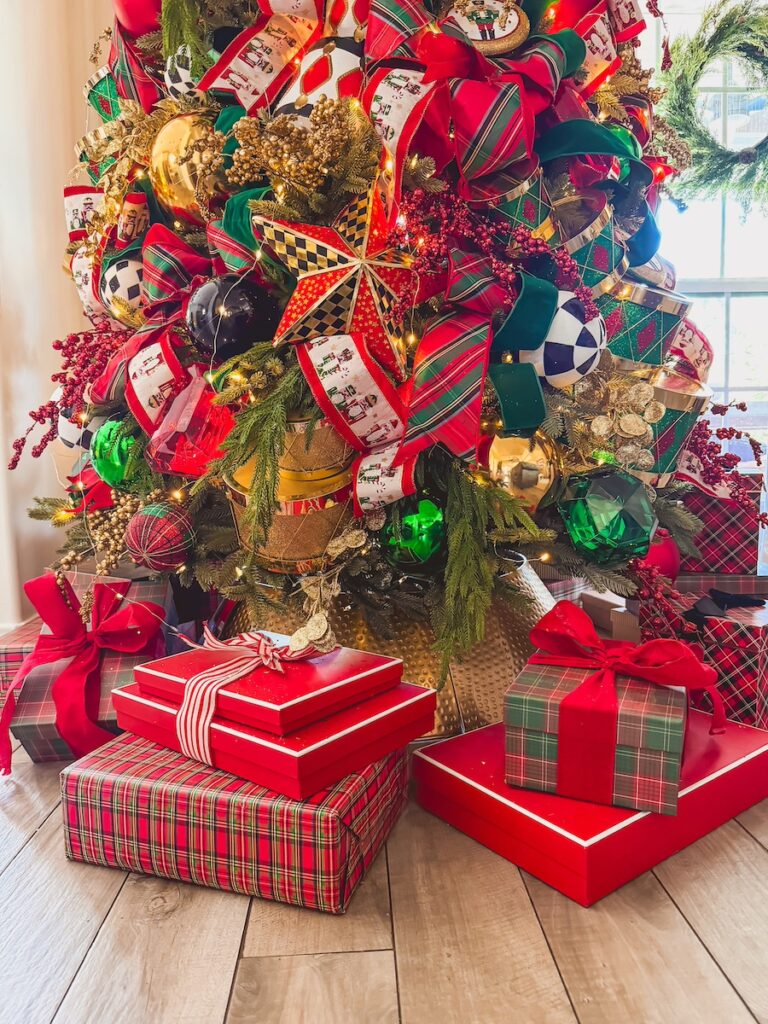
My tree is always classic and layered: rich reds and deep greens, touches of gold shimmer, tartan plaid ribbon, and a little black-and-white check (because I can’t resist a hint of MacKenzie-Childs charm). Over the years, I’ve learned exactly how to make a tree look like it came straight out of a designer catalog — and today, I’m walking you through it step by step, even if you’ve never decorated a tree before.
If you’ve ever looked at a professionally decorated Christmas tree and wondered, “How do they make it look so full and layered?”, this guide is for you. I’m walking you through exactly what to do — step by step — from fluffing your branches to topping it off with the perfect bow. You’ll also find exact counts for lights, ribbon, picks, and ornaments for every tree size so you can plan your supplies with confidence.

How To Decorate A Christmas Tree like a Pro
Step 1: Fluff & Shape — The Foundation of a Designer Tree
Before a single light goes on, take time to fluff every branch. This step makes the biggest difference in getting that full, lush look.
Start at the bottom and work your way up. Spread each branch out like a fan — bend some tips upward, some downward, and some sideways to fill any open spaces. Don’t rush this part; it sets the tone for your entire tree.
Why it matters: A fluffed tree creates depth and prevents gaps once lights and ornaments go on. Think of it as the “foundation” of your Christmas magic.
Step 2: Lights — From the Inside Out
Lighting is where your tree truly begins to glow. Always start closest to the trunk and work your way outward.
How Many Lights You’ll Need
- Plan for 100–150 lights per foot of tree height.
- A 7.5-foot tree looks best with around 900–1,100 mini lights.
How to Add Lights
- Plug in your lights before placing them so you can see your coverage.
- Begin at the base and weave the strand deep inside the tree near the trunk.
- Work in an “S” shape, bringing the lights back out toward the tip of each branch, then back in again.
- Continue this pattern up the tree.
Why it matters: Layering lights inside and outside gives a soft, magical glow from every angle — not just the surface.
Step 3: Ribbon — The Designer’s Touch
If there’s one secret to a designer-quality Christmas tree, it’s layered ribbon. Ribbon adds flow, color, and dimension — and when done right, it makes your tree look truly professional. You can find ribbon from a variety of stores but my favorite place to buy high quality ribbon is Decorators Warehouse.
My Ribbon Combo
For my own red, green, and gold tree, I always use two main ribbons:
- A tartan plaid ribbon for pattern and tradition
- A red velvet ribbon for rich texture and depth
Both are 4 inches wide and wired, which makes them easy to shape.
Pro Tip: Always use high quality wired ribbon. It holds its shape, loops gracefully, and photographs beautifully. A higher quality ribbon will come with a higher price tag but it will also last year after year. I’ve had this ribbon for 3 years and it still looks brand new.
How Much Ribbon to Use
- Plan 3–4 yards per foot of tree height for cascading ribbon coverage.
- For a 7.5-foot tree: 26–30 yards total, or 2 to 3 rolls per ribbon style.
How to Add Ribbon
- Cut ribbon into 24 to 36 inch pieces — super long ribbons are hard to control.
- Create a small loop bow at one end, then secure on the tree with either a branch or floral wire. I have a more detailed blog post of how to add ribbon here.
- Cascade the ribbon diagonally, tucking it in every 8–12 inches.
- Work in alternating directions (some left, some right) to mimic natural movement.
- Once you’ve placed your main ribbons, add your *accent ribbons sparingly between ornaments for extra texture.
*After I place my large ornaments, I add two optional accent ribbons for extra texture and personality — one Nutcracker-themed ribbon and one green velvet ribbon. These smaller “bonus ribbons” pull the theme together and give the tree more layers and movement.
Why it matters: Ribbon acts as your design blueprint — it defines flow, color, and texture. It also fills space beautifully without overwhelming your ornaments.
Step 4: Add Garlands (Optional but Gorgeous)
If you’re using beaded, wooden, or pearl garlands, now’s the time to layer them in. Keep your loops loose and natural — about 10–12 inches between dips — and secure them gently behind branches.
Pro Tip: Anchor each garland loop at the back with a small twist tie so your spacing stays perfect and even all season long.
Step 5: Large Ornaments — Build the Base
Now that your ribbon flows, it’s time to add your largest ornaments. Think of these as your “anchors” — they’ll set your pattern and spacing for the rest of the tree.
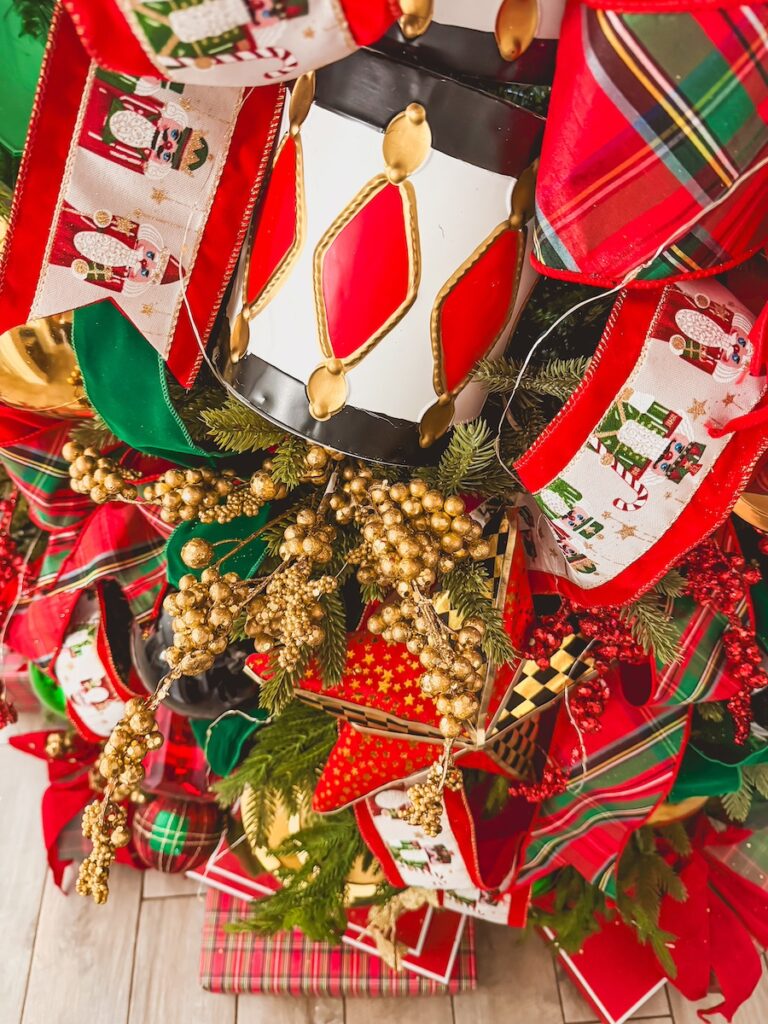
I use large oversized drums to add to my Nutcracker theme. Start by placing them evenly around the tree, working in triangles. Then I add my largest bulb ornaments that go with my color scheme. Tuck some deep inside the branches to create depth.
Why it matters: Placing large ornaments first helps you balance color and weight before adding smaller details.
Pro Tip: For a 7.5’ tree, aim for around 20 large ornaments to create balance and dimension.
Step 6: Medium Ornaments — Fill the Gaps
Medium ornaments bring your design to life. Alternate between matte and glossy finishes, and spread colors evenly. Mix in fun statement pieces — nutcrackers, bells, or bows — to make your tree feel personal and playful.
Keep checking your spacing as you go. A good rule: no two ornaments of the same color or finish should touch.
Why it matters: This is where your tree starts to look styled, not random. Balancing finishes gives it a polished, professional feel.
Step 7: Small Ornaments — Add the Magic
This is your finishing touch. Use small ornaments to fill every little gap and create twinkle. Hang them near the ends of branches so they catch the light beautifully.
Why it matters: Small ornaments are what make your tree feel complete. They’re like the jewelry that ties everything together.
Step 8: Picks, Sprays & Floral Clusters — Layer Texture and Drama
Picks, sprays and floral clusters are what give your tree that designer “wow” factor. They add height, movement, and dimension that simple ornaments can’t achieve.
For my tree, I love gold and red berry picks, glittered pine branches, and frosted greenery. Insert them at different angles to break up the shape and draw the eye upward.
How Many to Use:
- Around 1–2 picks per foot of height, plus 6–10 for the topper.
Pro Tip: Don’t just stick picks straight out — vary the direction! Some upward for lift, some outward for fullness, and some downward for a cascading feel.
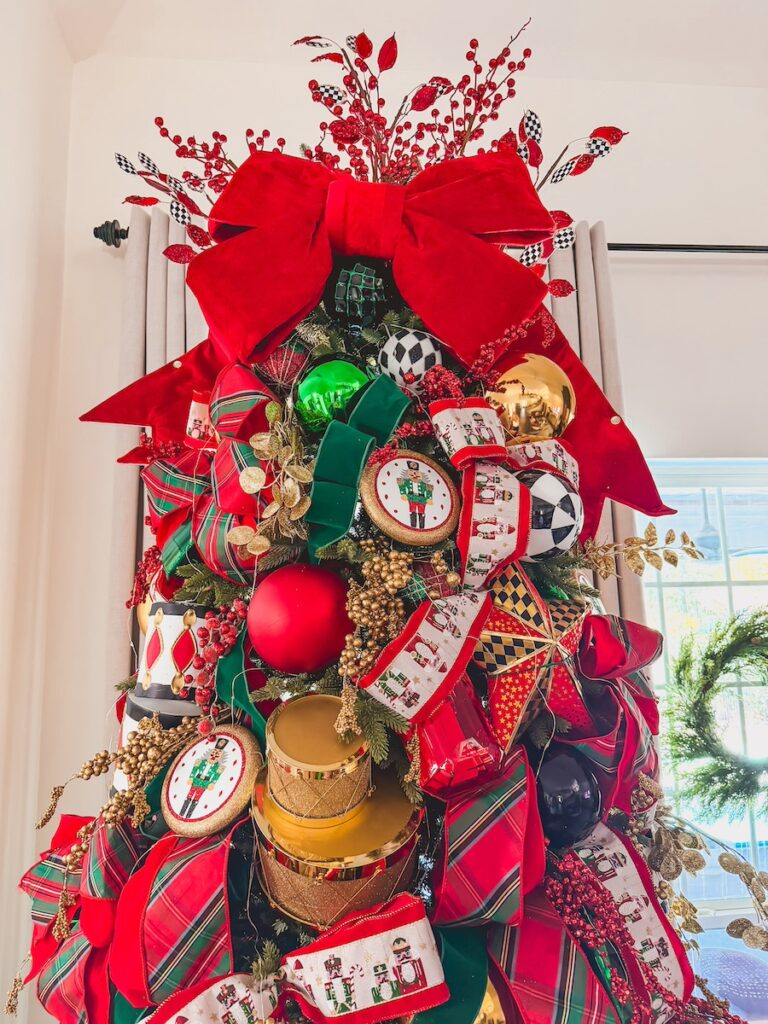
Step 9: The Topper — Your Tree’s Crown
Your topper finishes the entire design. I build mine in layers:
- Start with your picks for structure.
- Add your statement topper (a star, bow, or angel).
- Tuck in a few flowing ribbon tails to connect it all together.
Pro Tip: If you have tall ceilings, use longer decorative picks or branches that extend upward. It makes the tree feel grand and balanced.
Step 10: The Base — Ground Your Design
Finish your tree with a skirt or collar that complements your theme. For my classic look, I love a simple gold metal collar or a red-and-gold velvet skirt. Add a few wrapped boxes or baskets for a styled, finished base.
Pro Tip: Use empty boxes wrapped in coordinating paper to fill space before presents arrive — it instantly elevates the whole tree area.
The Magical Finishing Touch: Waterfall Fairy Lights
Every year, after I’ve placed the last ribbon and tucked in the final floral cluster, there’s one little addition that brings the entire tree to life — waterfall fairy lights.
These delicate strands of twinkling micro lights cascade from the top of the tree down like falling snow, adding a soft, shimmery glow that makes the whole tree sparkle. They give your Christmas tree that magical, storybook feel — especially in the evenings when the house lights are low.
The subtle twinkle effect is what sets them apart from traditional lights. It’s not flashy or overwhelming — just a gentle, romantic shimmer that makes the tree look alive. It’s truly the final touch that takes your tree from beautiful to breathtaking.

Pro Tip: Start your waterfall lights at the very top of the tree and let them drape down evenly around all sides. I like to tuck a few strands deeper into the branches to add depth, and leave others trailing closer to the surface so they catch the light perfectly.
I’ll link the exact fairy waterfall lights I use on Amazon [here] — they’re my go-to year after year, and the easiest way to add that magical finishing touch to your tree.
Watch the Video
If you’re more of a visual learner, you’ll love this video! I’m walking you through exactly how I decorate my Christmas tree from start to finish — from layering tartan plaid and red velvet ribbon to placing my giant drum ornaments and my oversized bow topper. You’ll see the full step-by-step process unfold, including my favorite finishing touch — those twinkling waterfall fairy lights that make the whole tree sparkle. Press play below to watch the magic come together in real time!